5 Essential Mixing Tips from Nicklas Sonne

RPM Records. Inner Groove Distortion Mag. Music Technology
Earlier this year RPM Records signed into a partnership with Nicklas Sonne for vinyl mastering. On our first visit to Sonne Studios we spoke about mixing in DAW. Nicklas shared his favorite mixing tricks in Presonus Studio One using sound snippets from the unreleased Defecto material.
Nicklas Sonne is best known as guitar player/singer for well acclaimed Danish metal band Defecto and a number of other bands. Defecto warmed up the stage for rock superstars Metallica and Rammstein and has been quickly gaining credibility after the second album release Nemesis in 2017 on a record label Primal Collective from Copenhagen.
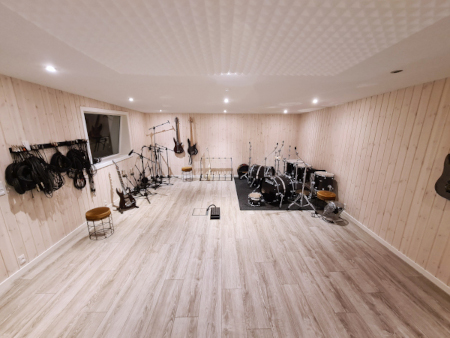
Nicklas Sonne is also a mixing and mastering engineer. Previously worked with Flemming Rasmussen, who won a Grammy Award for producing Metallica’s “One” in 1989. Recently, Nicklas opened the doors of his personal recording, mixing and mastering facility Sonne Studios in Greve, the Greater Copenhagen.
“I’ve been working as Flemming’s assistant engineer and eventually I had too many clients to stay with him. I needed my own studio, because I always ended up helping him in the day time and then working with my personal clients at night.”
Sonne Studios can host a band of up to 10 people and offers professional recording, mixing, mastering and production services. It contains both a drum and a vocal booth equipped with high-end microphones such as: Neumann U87, Seinheiser MD1441, Neumann KM184, Shure SM57, Beyer Dynamic TG58, Sennheiser MD421.
–Mixing Tips–
#1 PARALLEL SNARE COMPRESSION
Having a very busy track with drums, guitars and vocals, your snare may get really buried in the mix. And in some compositions you want your snare to sit tight, stand out and breathe.
What I usually do to fix these issues is duplicate the snare bus and parallel compress the duplicated snare drum with the original snare track. Actually, I parallel compress the whole drum kit, but I also do it separately for the snare drum. Then my clean snare signal is blended with heavily compressed snare signal. One of the snare buses is, of course, too heavily compressed for using it as the main snare. So I blend two snare tracks together. It’s the same snare, but with the effect track mixed in. And then I blend them as much as I want it to be “boomy”, wide and big.

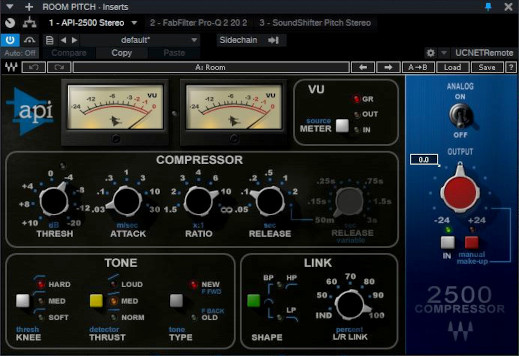
I’m using API 2500 compressor and that’s from Waves Plugin Suite. As long as your compressor allows a very fast attack and a short release, you are able to do this.
Find my compressor settings in the screenshot→→→
It has to cut really hard when the attack hits and then release it slowly as well. If you have a compressor that can do that, I think all compressors can do that, actually. But I always use this one, I love this one. It’s a personal preference and it’s easy to use. You may as well use EQ if you want to have a bit more top end, but I usually just leave that to the whole third bus. So I have the snare bus, the parallel snare bus, root them together into a whole other bus and control the two together. I make the mix there and adjust the volume easily.
It’s just one of those very subtle things that you have to really listen closely to know that something’s been changed, but you can surely hear it.
#2 DUPLICATED AMBIENT MICS
My second mixing tip is actually for drums too, because it is pretty hard to mix them properly. I use this quite often, especially when I mix a bit slower song and I want a very loud feel. It has to feel like you are in a big open room and sometimes songs were not recorded that way.
To fix these issues I almost always duplicate ambient mics, then root the duplicated tracks to a separate group and pitch them down by three semitones. A minor scale thing. At the end it sounds like a 20-inch hi-hat. A bit more aggressive, raw and dirty.
Then I compress duplicated tracks a lot and blend them into the main drum mix.
I use Soundshifter Pitch Stereo from Waves for pitch shifting. I pitch it down three semitones, and I add a very aggressive EQ setting because I don’t want too much information in the low-end. Simply because toms, snare and kick are feeding into overhead mics and I am manipulating the pitch of those as well. It’s alright for the snare, but I don’t want to have toms and kick pitched down by three semitones. So I’m kind of fading out the low-end here. I am using Fab Filter Pro Q plugin, but you can achieve similar results with any decent EQ plugin.
What I touch on most is the middle and most importantly the high frequencies from the overheads with cymbals and hi-hat. That’s really what I aim to make the bigger sound of.
And of course, I add a lot of compression because I want the room to be firm and big. When you need something to sound bigger, you just compress the hell out of it, and it will sound a lot bigger immediately.
Find my EQ settings in the screenshot↓↓↓

#3 MIXING VOCALS
One of my favorite vocal mixing techniques is with chorus effect on a parallel vocal bus. It is a trick I use almost every time to make vocals sound richer and make them sit in the mix better.
However, it is very important to find a sweet spot and not over do it. The spot where listeners won’t feel that there is a chorus on your vocals. It must be just before that, so it works more as an ambient effect. Yet again, it is better to duplicate vocal tracks and then add chorus on a parallel vocal bus, either via an effect-send or directly and blend it in with clear vocals.
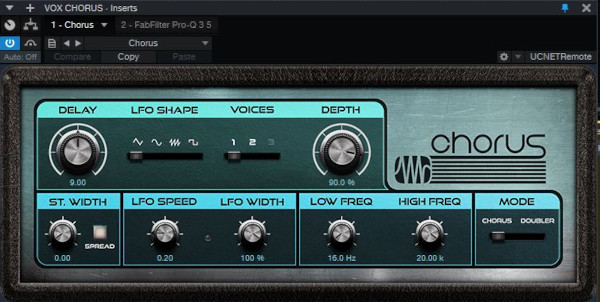
My effect-send level is 0 dB, so there is quite a lot of chorus on the vocals. However, I always record three vocals. One in the middle of the stereo panorama (the main one), then a left one and a right one. That is also why I can put so much chorus on the main vocal in the center. It’s because I have clear vocals on the sides. So you can’t hear the effect so much.
I use chorus that’s built into my DAW in Studio One by Presonus. It’s a standard one that comes with the Studio One. I would say that I use just basic settings, but with the width turned all the way to the sides of the stereo panorama. And I have it spreading through the whole EQ band. It is important to have chorus on a wide frequency spectrum. If you are using another chorus effect, just make sure it widens through all the spectrum.
Sign Up For Vinyl News
#4 MIXING BASS
A super busy mix in metal music usually causes difficulties for the bass guitar to stand out in the mix. And I believe this is a trick that everyone in metal uses, because you just can never hear the bass.
I have 3 bass guitar tracks: first is a direct input (DI) recording, the second is a duplicated direct input (DI) recording, and the third is a mic recording from the bass amplifier. I will be talking only about direct input tracks here.
In order to lift bass guitars out in the mix, I use distortion effect on the duplicated track and that helps a lot in bringing the instrument forward and making it audible in the mix.
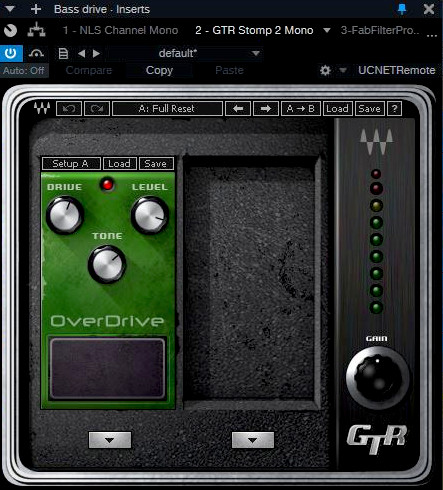
I copied the DI recording to another track and I called it “bass drive”. I keep them as two separate tracks running alongside each other, and I adjust the volume accordingly. Then I just add effects on the “bass drive” track.
I use GTR3 STOMP effects from Waves. I either use this drive, or I use the Fab Filter Saturn which is an overdrive effect as well. I would say that my choice depends on how the bass guitar recording sounds. I also use a lot of EQ on the effect track. That’s the most important thing because I want to target just particular frequencies and I want to cut the low-end from the distortion effect track to avoid phase issues.
When you duplicate tracks and add effects on one of the tracks, you will always bump into phase issues in the low-end. And over-driving the low-end frequencies is not necessary. We want to touch more on mid-low and high frequencies where guitars and snares are.
It’s always important to keep in mind what you’re going to do with guitars, because guitars and bass are fighting for space in the same frequency range. On top of that, your “bass drive” track will be overlapping with snares, vocals and guitars, so there are a lot of instruments fighting for the same space. Similar situation is that of bass drums, bass guitars and the low-end of guitars. It’s always the same frequency range. In short, just always make room for everything with adequate EQ settings. It has to overlap but still be able to breathe with each other.
Find my EQ settings for the bass drive track in the screenshot↓↓↓

#5 SIDE-CHAIN COMPRESSION FOR GUITARS
Side-chain compression is a very important thing to do for guitars in relation to snare drum and vocals. Yet again, because those instruments are overlapping in the same frequency range. In order to bring guitar solos or vocals up, I side-chain them. So when one instrument is active, another that is in the same frequency range will play at lower volumes due to compression.
I use a stereo C1 Compressor from Waves and I side-chain that into vocals, the snare and solo guitars or a melody. So each time vocals hit, my guitars will duck down just a little bit. And each time the snare hits, again guitars will duck down just a little bit, very subtle and very quick. I have a very short release on vocals and snare compression. It’s about 0.50, not a lot. The same technique applies for main and solo guitars. My main guitars will duck down when the solo guitar starts playing, so it will be able to breathe on top of the mix. That’s the main side-chaining I do for guitars. I don’t think I do much else other than mixing the sound of it.
MAKING SPACE
I want to talk a little bit about the general use of EQ in mixing and the importance of making space. Because in mixing it’s all about making individual instruments breathe and not being squashed within overlapping frequencies. You want to achieve the feeling when listeners can differentiate toms from the kick and so forth. And that is difficult to achieve. One way to do this is by being very drastic with equalization of specific elements.
For example, my snare is peaking at 188 Hz. I’m going to find that spot on guitars and I will completely cut that information down from guitars, because I just want to hear my snare here all by itself.
Let’s say that my kick drum is peaking at around 50 Hz to 60 Hz. In order to give some attack and space for the kick drum, I will scoop down a lot of information from my bass guitar, especially at 50 Hz and all the way up to 80 Hz, because my kick drum is boosting at 55 to 60 Hz.
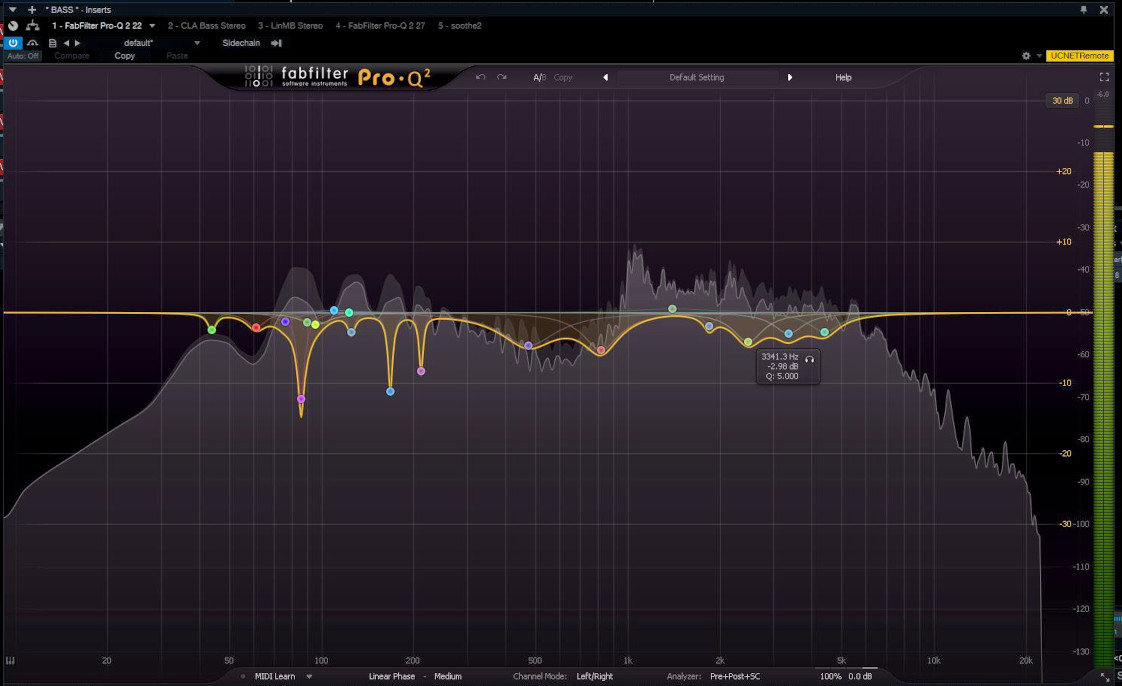
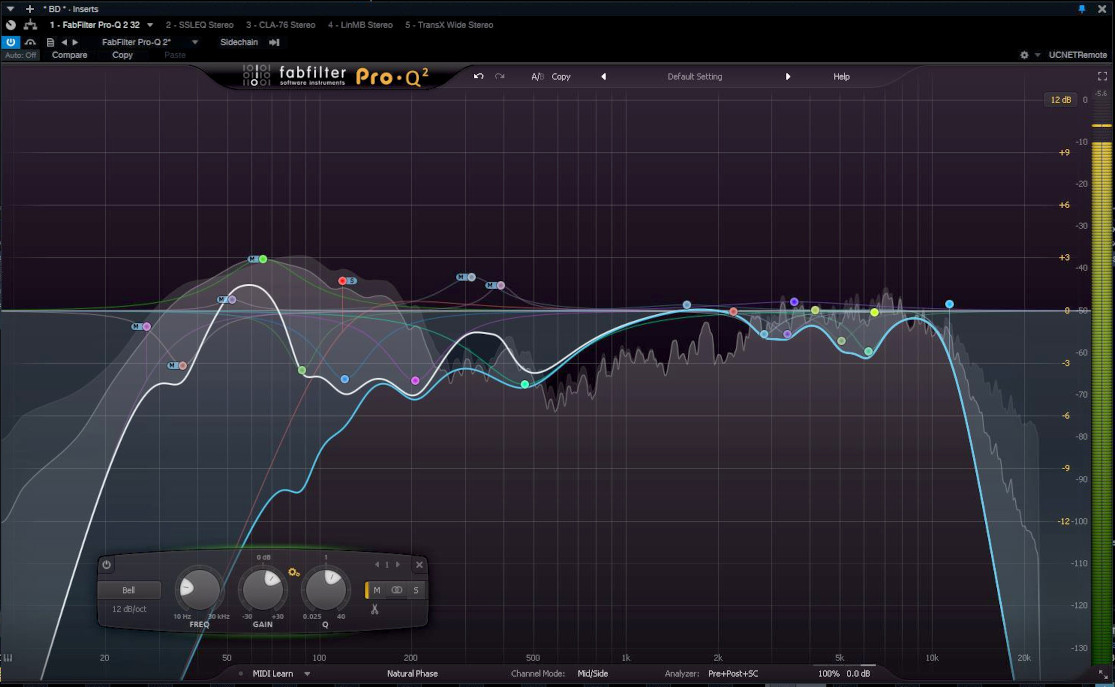
I created space for the kick with the bass and for the snare with guitars. I also side-chained the bass guitar to toms, so when toms are rolling, the bass guitar will dive down. There’s a lot of side-chaining in my mixes to create space for all instruments, especially solo guitars, vocals and snare drums.
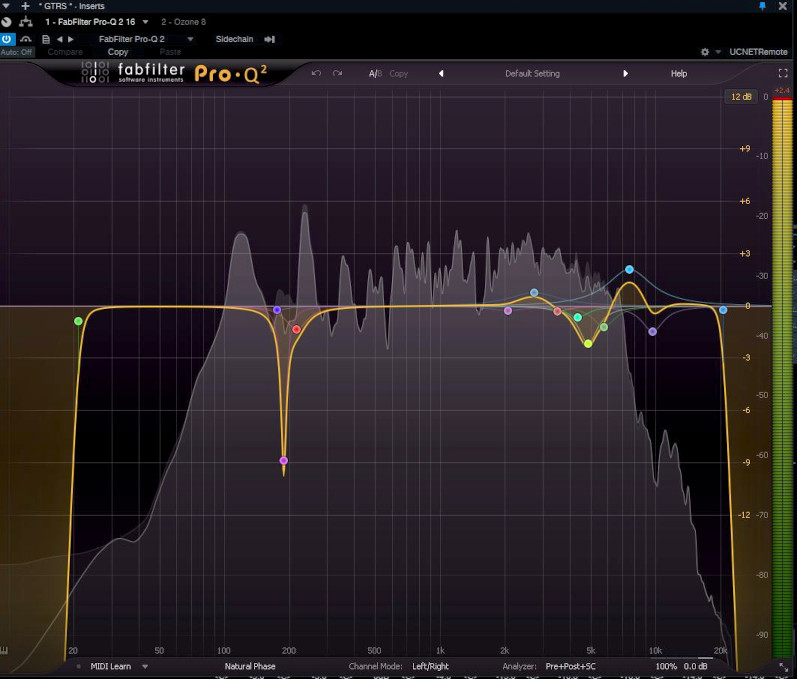

When I EQ something, I always look at the whole frequency spectrum to analyze where instruments sound the best. For instance, vocals are peaking at 600 Hz, then you don’t want guitars to peak at 600 Hz. You want guitars to peak at 800 Hz – 900 Hz, and then you just cut it down at 500 Hz – 600 Hz – exactly where vocals are peaking. And the same applies for the snare. But if the snare sounds good at 1500 Hz, then you don’t need to cut guitars. Just always have that in focus, and keep in mind to create space for different instruments, because there is only one spectrum of possible frequencies.
Can it be too drastic? It can’t be too drastic. I’ve been very drastic in my latest mixes and those are the ones that sound the best. Just go nuts!
***All information retrieved from a recorded interview with Nicklas Sonne at Sonne Studios in July 2020.
***Transcribed by Mioara Mihai. Edited by Dainius Groove.
Enjoy Your Vinyl!
Share This – Spread The Word

Quality Manager at RPM Records

